What is Zoom?
- Computer, tablet, or smartphone with:
- Built-in microphone, an external USB microphone, or Bluetooth microphone on a headset or earbuds
- Speakers or Headphones
- Built in or external USB webcam
- Reliable internet connection
System Requirements | Supported Web Browsers |
|---|---|
|
|
Download Zoom
- Click this link to download Zoom. It will automatically download the ZoomInstaller for your computer.
- If you are on a mobile device, you will be directed to your platform's app store.
- Run the ZoomInstaller from your download folder.
- After it completes, you will be prompted to Sign In to Zoom.
Signing In to Zoom with your UT Zoom account
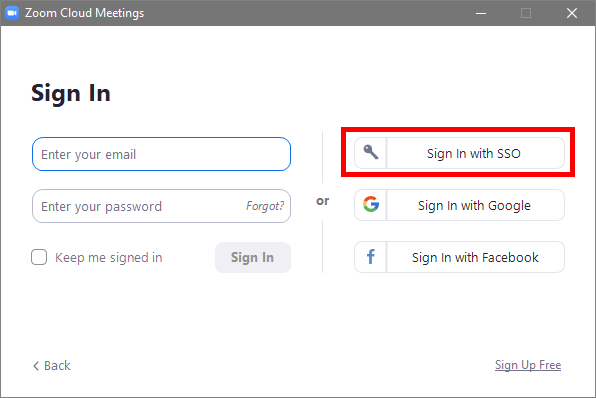
- Launch the Zoom Client.
- At the "Sign In" window, select "Sign In with SSO"
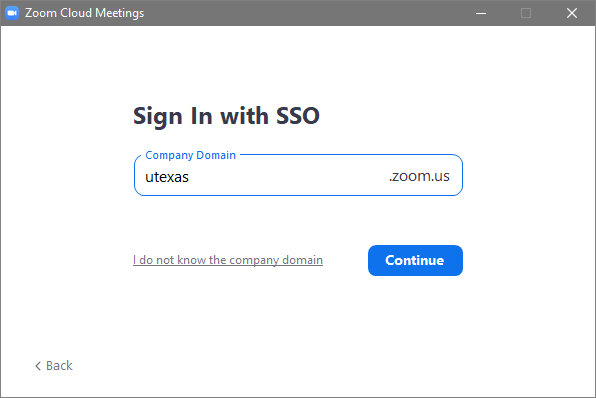
When prompted for a "Company Domain", enter in "utexas" and click "Continue"
Zoom will open a browser window and take you to a UT EID sign-in page, where you'll need to enter in your UT EID credentials and click "Sign In"
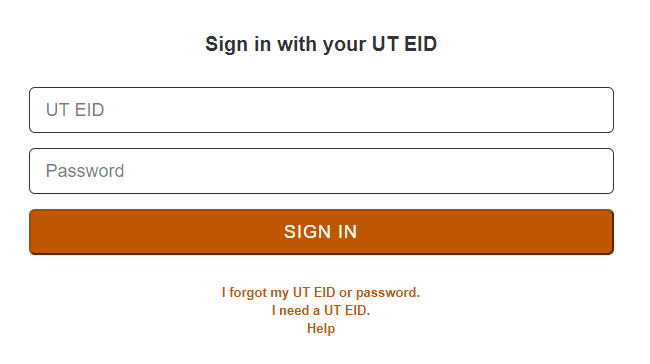
- You'll be taken back to the Zoom desktop application and will now be signed in with SSO
Signing Out of your personal Zoom and switching to your UT Zoom account
Security measures have been implemented to further secure Zoom classes and meetings at UT Austin. Faculty, staff and students are required to use the desktop client, mobile client or web client, and be signed into their UT Zoom account with their UT EID.
Additionally, other groups authorized to for UT Austin Zoom are required to use their EID. These groups inlcude future students, official visitors, affiliated workers, Univesity Extension and UT OnRamps students.
What do I need to do?
You must ensure you are using your UT EID (Single Sign On/SSO) account with Zoom to successfully join a class or meeting.
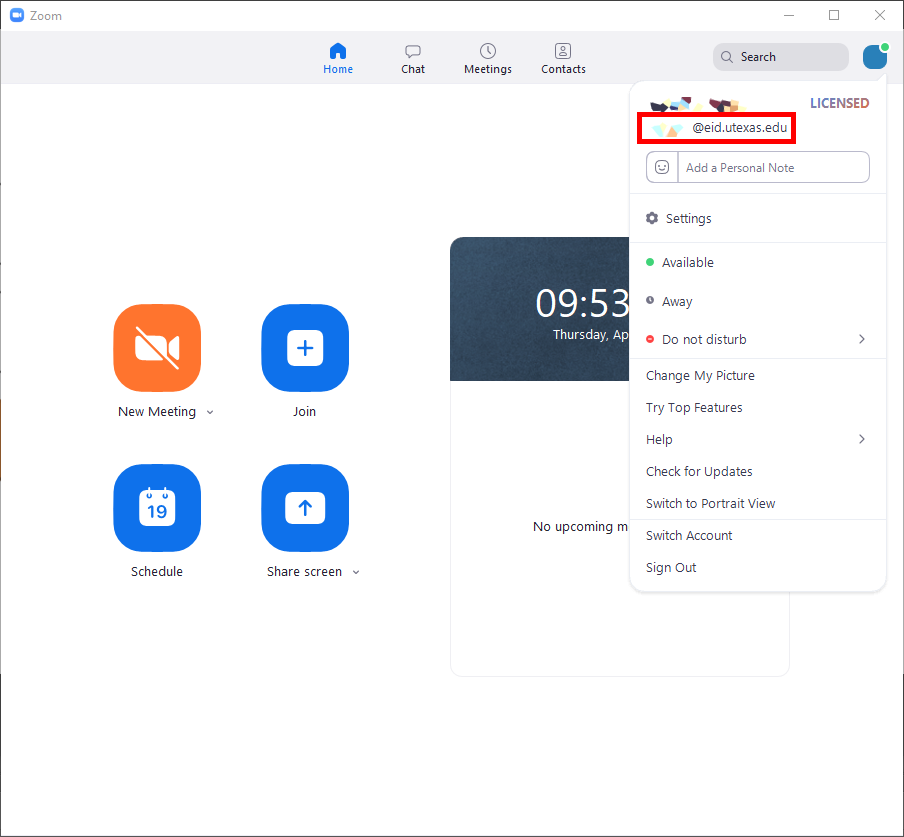
You must log out of any Zoom personal (Free or Pro) accounts. You can verify that you are using your EID by going to the desktop app and confirming [EID]@eid.utexas.edu is listed as the user. Click your profile icon at the top right of the Zoom application to verify.
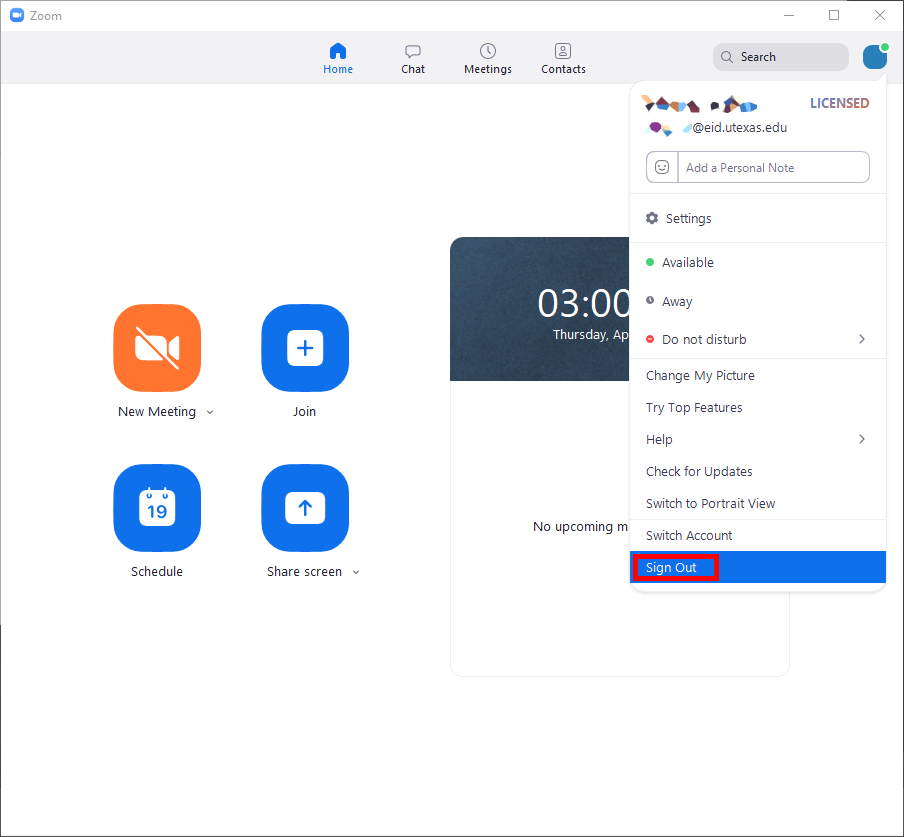
To sign out of Zoom:
- Launch the Zoom app
- Click your profile icon in the upper right corner
- From the dropdown menu, click "Sign Out"
Navigating your Zoom Client
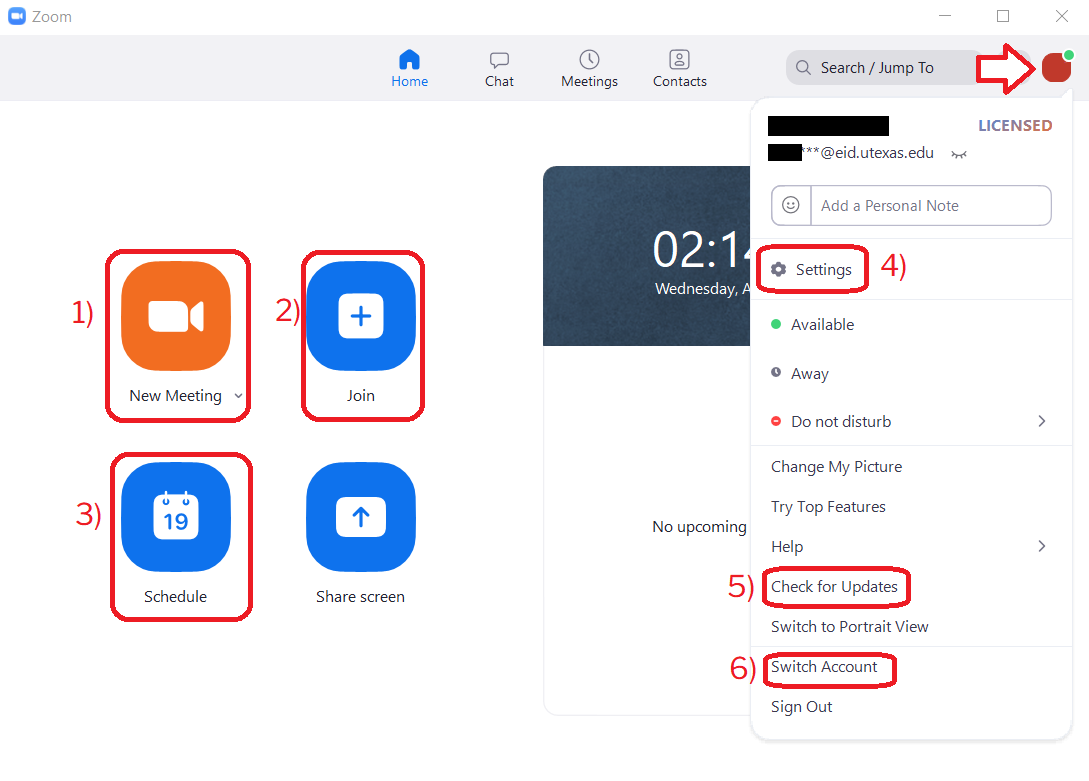
- Instantly start a new meeting.
- Join a meeting using a Meeting ID
- Schedule a meeting for future events.
- Explanations for settings can be found here.
Click on your profile/Initials for more options.
- Settings to customize how Zoom will run on your device such as:
- Accessibility options
- Audio and Video devices
- Backgrounds and Filters
- Check for Updates is the quickest way to update your Zoom client to the most recent version.
- Please visit zoom.its.utexas.edu for the latest minimum update required by UT.
- Switch Account is only necessary if you have a personal Zoom account, and you need to Sign-in with your UT Zoom EID account.
- Reminder! You must be logged in with your “eid.utexas.edu” account for UT Zoom activity. Your account address is [Your EID]@eid.utexas.edu.
Testing your Camera and Audio
You can test your Camera and Audio in Zoom here.
If you are using external cameras or microphone/speakers/headsets:
- More infomation on testing your video can be found here.
- More information on testing your audio can be found here.
Accessibility in Zoom
Zoom and UT provide tools and options to ensure your remote meetings and webinars are inclusive and accessible.
From the Services for Students with Disabilities:
- Creating an Accessible Classroom
- Accessibility Best Practices for Classes in Zoom [PDF]
- Accessibility Best Practices for Meetings and Webinars in Zoom [PDF]
From ITS:
Scheduling Zoom Meeting from Canvas for Classes
Please visit Using Zoom to Teach for current in-depth guides on how to use Zoom from within Canvas.
Scheduling Zoom Meetings from your Zoom Portal
- Sign in at https://utexas.zoom.us/ using your UT EID and Password
- This may require Duo for Multi-Factor Authentication

- Navigate to the Meetings on the left panel and click Schedule a Meeting.
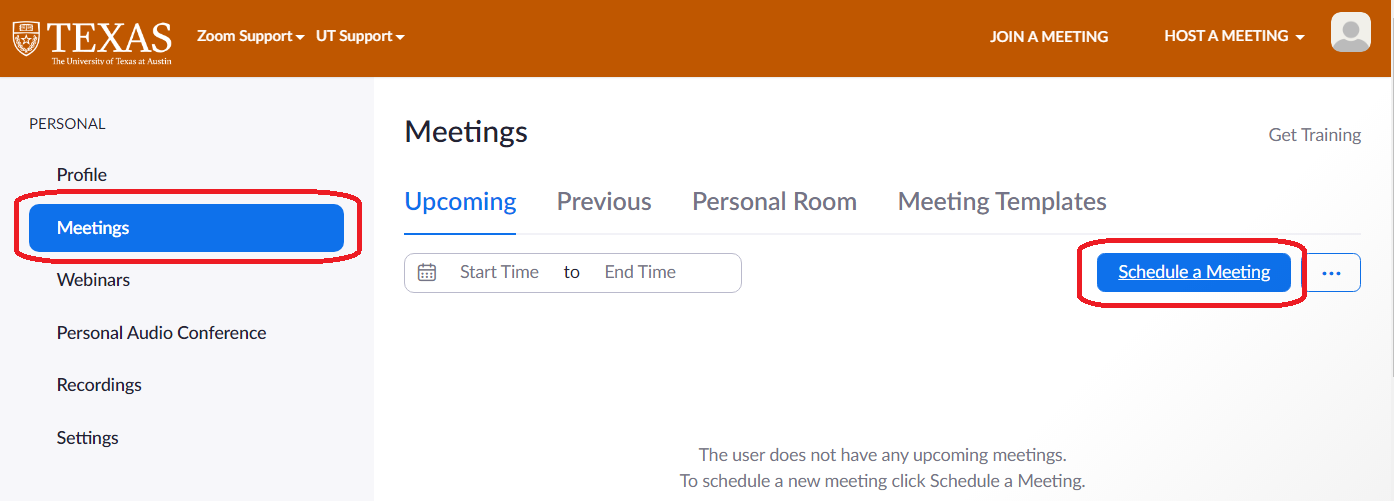
- Fill out the Meeting Settings and Save
- Your Meeting now has an Invite Link that can be sent to your particpants.
- By default, the meeting will only begin once you as a host or a designated Alternative Host Join the link.
Scheduling Zoom Meetings from Your Outlook
Note: This is a recommended method for scheduling Zoom Rooms in your department and for keeping Outlook calendars in sync with Zoom Meetings.
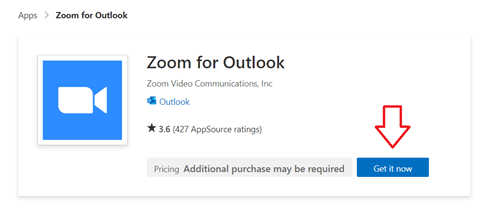
- Get the Zoom Add-in for Outlook.
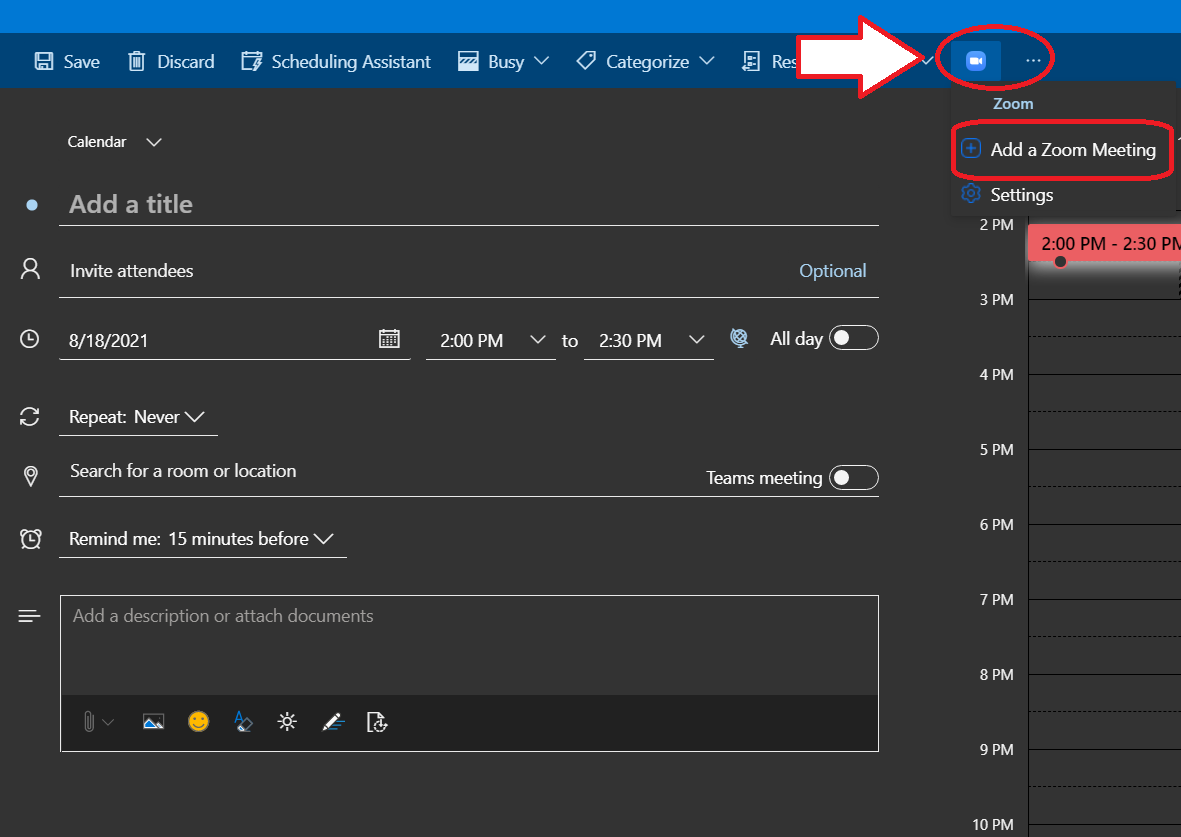
- In Outlook Calendar, click New Event to create a calendar invite. You should see a new Zoom icon has been added to the taskbar on top, although it may be hidden in additional “…” options.
- Click the icon and Add a Zoom Meeting.
- Note: you may need to sign in with your EID and Password
- Your Outlook Calendar invite now has created a Zoom link. Your invited attendees in the Outlook invite will receive the Calendar invite including the Zoom Join Link.
- If a participant will be using a Zoom Room, inviting the Zoom Room’s Outlook calendar address as an invited attendee will automatically reserve that Zoom Room to join the meeting.
- This method will create the meeting using your default meeting settings. If you need to modify any meeting settings from default, you can change them afterwards at the meetings section in your Zoom portal.
Meeting Settings
- Topic and Description for your meeting.
- Use a descriptive name for your meeting in the Topic field.
- If this is a recurring meeting, do not put the date in the Topic, as the topic repeats for every recurrence of the meeting.
- Time and Date settings for your meeting. You can also make the meeting a recurring meeting to re-use the same link and ID for multiple occasions.
- Requiring registration allows for you to require your participants to fill out a form before entering the meeting. The forms can be customized for your meeting’s needs.
- The Meeting ID is the identification used for your participants to Join your meeting. The ID can be Generated automatically, or it can be set to your persistent Personal Meeting ID.
- There are three optional Security methods:
- Passcodes (default off)
- Waiting Room (default on)
- Require Authentication to Join
- Use UT Austin if your event is exclusively for UT affiliates.
- Sign in to Zoom allows non-UT affiliate Zoom accounts.
- Video options set whether cameras are on for the hosts or participant as soon as they join the meeting. Note: even when off, hosts and participants can turn cameras on during meetings.
- Audio settings let you choose whether participants can use Phone, Computer Audio, or Both.
- Both are recommended unless encryption is necessary.
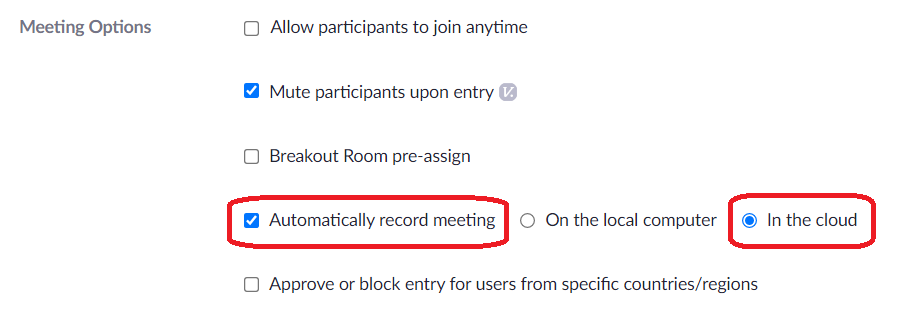
- Advanced Meeting Options:
- Allow Participants to Join anytime means your participants can enter the meeting before the host begins the meeting.
- Mute participants upon entry means participants will join the meeting with microphones muted. This is on by default, and we recommend leaving it on for classes.
- Breakout Room pre-assign allows you to add people to Breakout Rooms before the event begins.
- Reminder! Add UT Zoom users with [EID]@eid.utexas.edu.
- Automatically record meeting starts recording your meeting to either local or cloud.
- Cloud Recordings are recommended for reliability and ease. However, Cloud Recordings do have a 1-year retention period on our storage. Please reference our retention policy page here for more info and long-term storage options.
- Alternative Hosts are your backup hosts for managing the meeting. If possible, we recommend having an alternative host such as a TA.
- Alternative hosts can launch and end the event in case the host has an emergency such as power or network outage.
- Reminder! Please do not add hosts using their work email. Add alternative hosts using the [EID]@eid.utexas.edu format.
Participating in Zoom Meetings
- Students: If you are joining class via Zoom, please join from your Canvas calendar here
| Adding a Background or Blur to your Camera |
| Record Your Meeting |
| Set up Polling |
| Breakout Rooms |
Managing Zoom Meetings as Host
Hosts can Start Zoom meetings from either:
- The Meetings section of the Zoom portal
- The Meetings tab in the Zoom Client
- The Join link for the meeting, which will be in an Outlook invite
Control Your Zoom Meeting | |
Allow Others to Schedule for You |
Recording your Zoom meeting
Hosts have two ways to intiate recording:
- Note: If you have "Allow participants to join anytime" enabled, recording will begin if your participants join before the host.

- If you have opted into the Panopto and Zoom Integration, your recordings will automatically be sent to your Panopto.
- If the Zoom was scheduled in Canvas, it will be sent to that Course's folder Panopto.
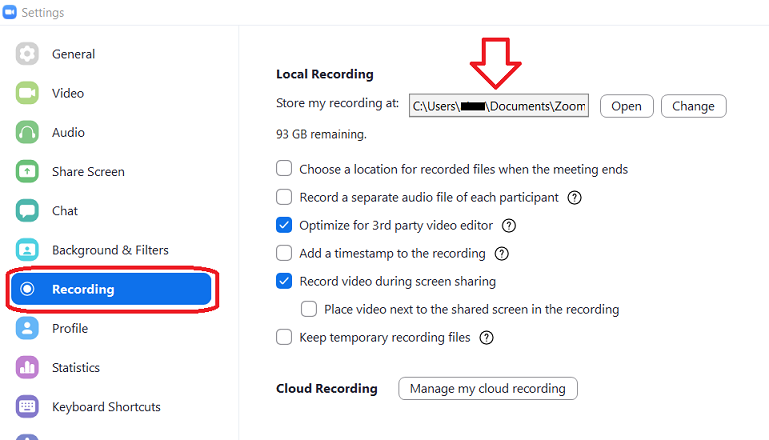
- Your Local recordings can be found on your device in a folder designated in your Zoom client Settings