Zoom Easy Scheduler (for Canvas use only)
- Creating a Zoom appointments schedule in Canvas as an instructor
- Booking a Zoom Appointment in Canvas as a Student
Add a Zoom meeting to a Microsoft Bookings calendar
- Creating a recurring Zoom link for Microsoft Bookings appointments
- Adding your Zoom link as pre-meeting reminders in Personal Bookings Calendars
- Adding your Zoom link as automated responses in Shared Bookings Calendars
Zoom Easy Scheduler for Canvas
Using the Zoom Easy Scheduler, instructors can create schedulable office hours within the Zoom section of a Canvas course for students to book appointments.
NOTE: This feature is only available for instructors and students within Canvas. For all other calendar scheduling, we recommend using Microsoft Bookings
Microsoft Bookings is free and available to all students, faculty and staff at UT.

Creating Zoom appointment schedules in Canvas [Instructors]
- Log into Canvas and navigate to your course's Zoom section.
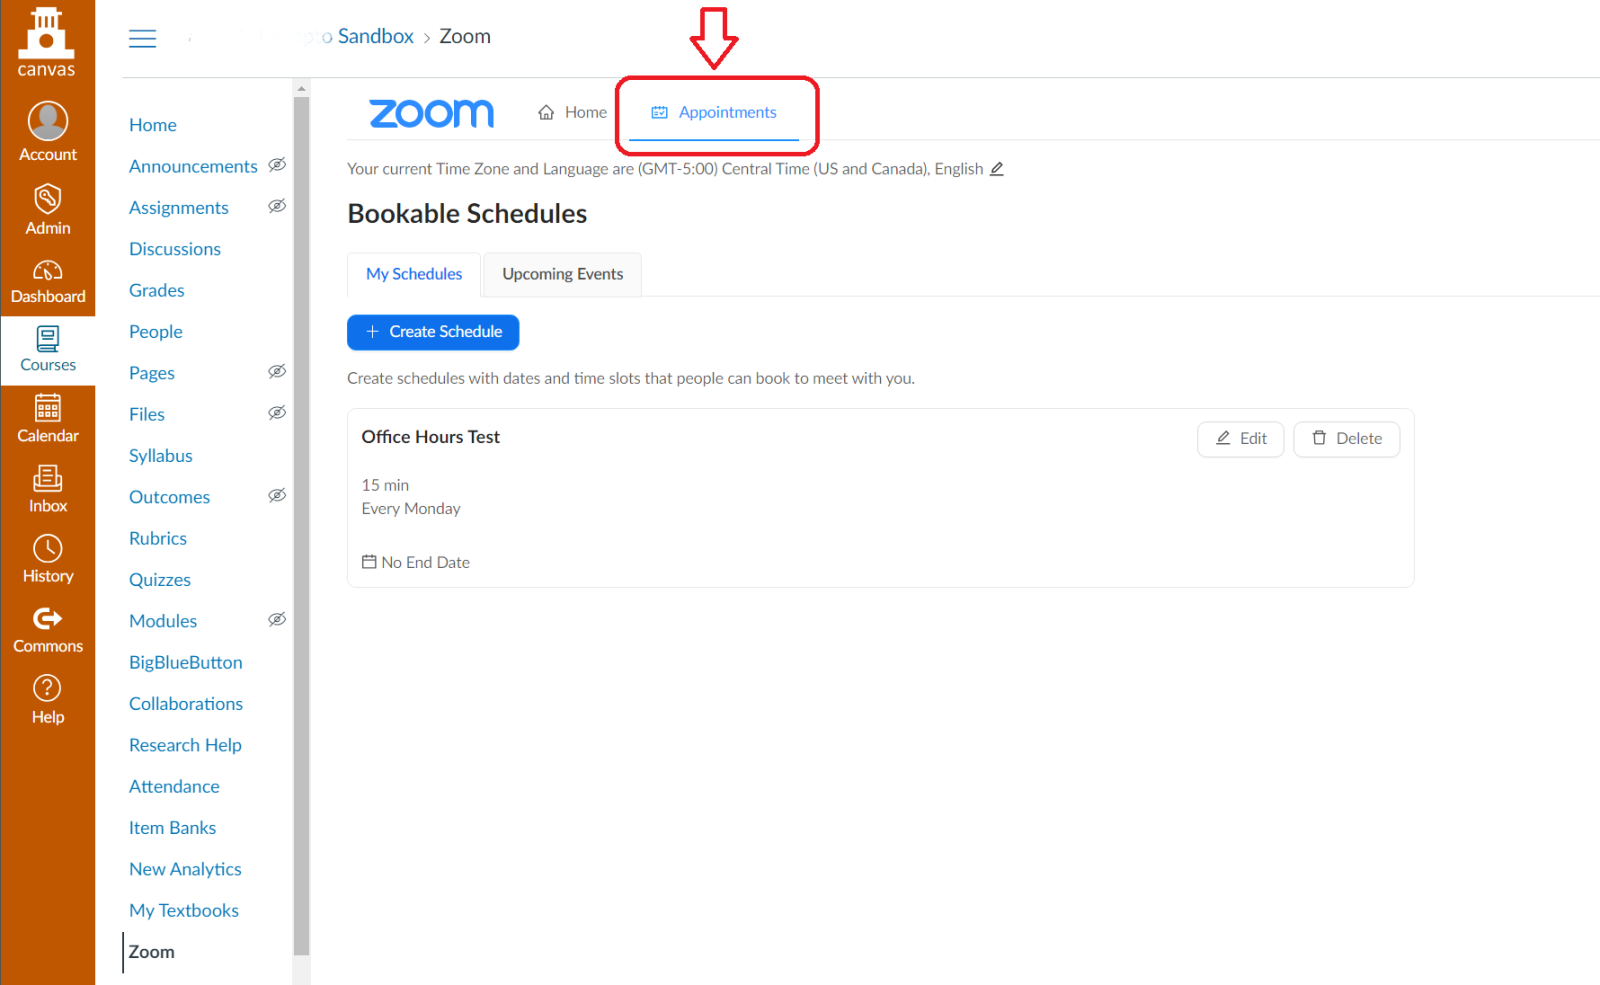
- Click the Appointments tab.
- Click My Schedules.
- Click + Create Schedule.
- Under New Bookable Schedule set the days you are available to meet with students.
- Enter the time slots you are available on the selected days.
Note: There must be a start and end time, and the slots can not overlap. - (Optional) Enable Follow the same schedule each day to set the time schedule for each selected day.
- (Optional) Enable End repeat on and select the ending date.
Note: Students will not be able to schedule appointments after this if enabled. - Enter the duration for how long appointments should last.
- (Optional) Add a description for the events.
- Click Save.
To modify or join your existing appointments:
- Click the Appointments tab.
- Click Upcoming Events.
The currently scheduled appointments will be displayed. In the Name column, the student's email address will be displayed.- Click Edit to edit a session
- Click Start, to start the appointment and launch the meeting.
- Click Cancel to cancel the appointment.
Booking Zoom appointments in Canvas
If the course instructor has set up a Zoom appointments schedule:
- Canvas and navigate to your course's Zoom section.
- Click the Appointments tab.
- Click Schedules.
- Click the desired instructor's scheduling calendar.
- Select an available time slot on the calendar.
- Review the appointment details.
- Click Book.
- You can join from the Appointments tab or from the invite sent to your Zoom calendar.
Adding Zoom meetings to a Microsoft Bookings calendar
By default, Microsoft Bookings can create a virtual meeting link in Teams that sends directly into the Outlook calendars of the participants.
Although Microsoft Bookings cannot automatically create Zoom links, you can customize automated responses in Microsoft Bookings to include a Zoom link, or distribute a Zoom link if Zoom is your preferred meeting platform.
Please reference this guide to cresting a Bookings Calendar for the first time. Bookings calendars can be made as either a Personal Bookings Calendar if you will be the only person managing appointments or a Shared Bookings Calendar if you are managing appointments with multiple people on your team or class.
Creating a recurring Zoom link for your Bookings appointments
You can set up a recurring meeting link for office hours two ways:
- Create a recurring Zoom meeting set to No Fixed Time
- Use a Personal Meeting ID
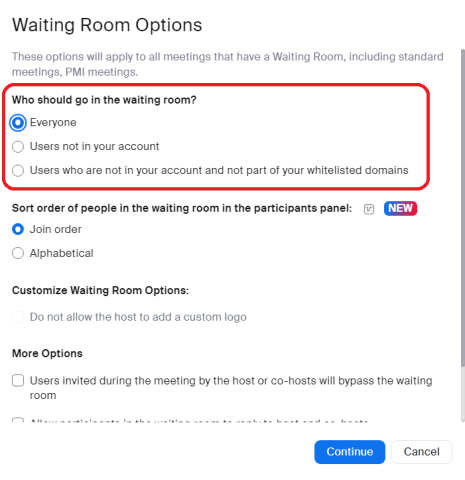
In both cases, we would recommend enabling the Waiting Room and changing your settings for "Who should go in the waiting room?" to Everyone to prevent users from overlapping times.
To do this:
- Go to your Zoom settings
- Click the Meeting tab
- Under the Waiting Room section, click Edit Options
- Select Everyone and click Continue

This will secure your "Bookings" Zoom links from having overlapping guests, as they will remain in the waiting room until you are ready to admit them as participants.
Adding your Bookings Zoom links to pre-meeting emails in Personal Bookings Calendars
- Go to your Personal Bookings Page
- Select the Calendar to which you want to add the Zoom link
- Click Advanced Options
- Click (+) Add an Email Reminder
- Adjust your time before the meeting you want the message send and paste your link in the reminder. This will send the link to the scheduler at the time before the meeting.
Adding your Bookings Zoom links as automated responses to Shared Bookings Calendars
- Go to your Bookings page and select the shared calendar to which you want to add a Zoom link response.
- If you haven't created a Bookings calendar, please
- In that Bookings calendar, go to Services and select the schedule you want to modify
- Click Edit Service
- Toggle off Add Online Meeting to prevent an additional Teams meeting link from being created
- Click the Notifications tab in the Edit Service window
- In the Email Confirmation section, paste your Zoom link created in the previous section in the Add Additional Information
Your schedulers will now receive a link in the confirmation and calendar invite for your Zoom meeting.

